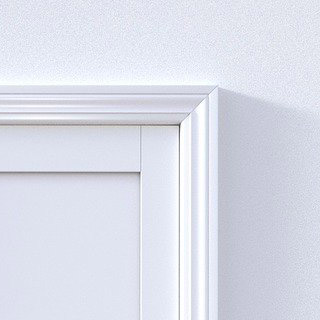
Before learning how to install door trim, decide if you want the pieces to meet with miter or butt joints. Miter joints have 45-degree angles and butt joints meet at a 90-degree angle. The wood trim itself is known as casing and it comes in a variety of flat or molded styles. If you need help replacing your front door or another exterior door on your home, request an estimate from the experts at PJ Fitzpatrick.
How to Install Door Trim Step by Step
Prepare the door jambs:
- Set a straight edge against the wall overlapping the door jamb.
- See if the jamb aligns with the wall, is recessed from the wall, or extends beyond the wall.
- If jambs align with the wall, proceed to Step 7.
- If jambs are recessed by 1/8 inch or less, mash the drywall edges with a hammer to align them with the jambs.
- This does not work for plaster walls.
- Alternatively, you could nail narrow strips of wood along recessed jambs to make them flush with the wall.
- If the jambs extend beyond the wall, plane them down to meet the wall. Alternatively, you may leave the extension but use shims behind the nails that go into the wall.
- After resolving any issues with the jambs and wall, mark the reveal.
- Use the combination square and pencil to mark a line 1/8 to 1/4 inch back from the face of the jamb.
For casing with mitered joints:
-
- Line a piece of casing up with the reveal mark on one side.
- If the floor is not level, trim the bottom of the casing with a saw or rasp so that it sits flat.
- Repeat Steps 1 and 2 with another piece of casing on the other side of the door.
- With the casing held in place against the reveal line, mark where the header casing will connect.
- Cut a 45-degree at an upward and outward angle from the tops of the side casings.
- Hold another piece of casing along the top of the door.
- Mark where the header piece will connect with both side casings.
- Cut 45-degree angles on both ends of the header.
- Nail one side casing to the jamb with 4D finish nails at roughly 16-inch intervals.
- Test fit the header connection at the mitered corner.
- With a rasp or plane, grind or shave the wood to perfect the corner if necessary.
- Once satisfied with the joint, spread glue behind the header piece and fit it against the side casing.
- Nail the header into the top jamb.
- Repeat Steps 10 through 12 with the other side casing.
- This time, trim the side casing to perfect the mitered joint if necessary.
- Nail the second side casing to the jamb as in Step 9.
- Now take 6D nails and nail the casings to the walls.
- If you had to use shims to account for an uneven surface, place shims everywhere that you nail.
- Trim the shims with a utility knife.
- Caulk around the outer edge of the casing if you intend to paint.
- Use the nail set to drive the nails flush with the wood without denting it.
For casing with butt joints:
- Learning how to install door trim for a butt joint might be a little easier because you don’t have to worry about fitting angles.
- Prepare the door jambs as described above and mark the reveal as explained in Step 8.
- Hold a piece of casing against the side of the door.
- File or trim it if necessary to ensure that it stands flat on the floor.
- Mark where it meets the line for the header reveal mark.
- Cut the casing straight across at 90 degrees.
- Repeat this process for the second side casing.
- Nail the side casing pieces with 4D nails in the jambs and 6D nails in the walls.
- Measure a header casing so that it extends 1/4 inch beyond the outer edges of both side casings.
- Cut the header to fit.
- Nail the header into place.
- Caulk the outer edges if desired.
- Set the nails flush with the wood without denting the material.