Have you ever wondered how to fix a leaking roof from the inside or if a project like this is even possible? You know PJ Fitzpatrick has a team of roofing experts that can help you with any roofing repair or replace your entire roof if necessary. But, if you need an immediate temporary solution to a leaking roof, and the only option you have is to replace it from the inside, we want to help you accomplish that. If you don’t own a ladder, or the weather isn’t conducive to working outside, our experts show you that you can make temporary repairs to your roof until a more permanent solution can be made.
Fixing the Roof
Keep in mind that these methods are considered temporary fixes. The only permanent solutions to a leaking roof is a professional repair or replacement. But, depending on the age of your roof and the overall condition, this may help to buy you some time.
Diverting the Water
You may not be able to seal the leak right away, especially if it’s raining and wet. Roof patch will not hold in wet conditions until it’s had time to cure.
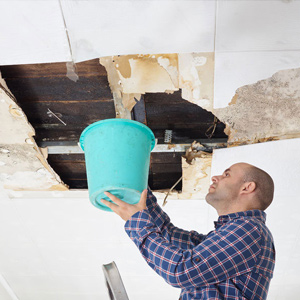
- You need to provide a path for the water to drain. The easiest way to do this is by sticking a nail into the hole. It will attract the water to it, and allow it to funnel in one direction.
- Place a large 5-gallon bucket under the area to catch any water that drains. Make sure the bucket is large in case it fills quickly.
- Wait until the area is dry enough to seal the leaking area.
Sealing the Leak
If the damaged area is already dry, you don’t need to use the above trick for diverting the water. You can go on to this step of sealing the leak. If it has been raining, then you must wait for things to dry out before you can seal it.
- First, you must identify where the leak is coming from. The best way to find the source of the leak is to go into the attic or crawl space above the home.
- Next, take a flashlight and shine it around check for areas of dampness. These are usually easy to find because moisture causes darkness and mold.
- Using marking chalk, draw a circle around the area that is problematic. This marking will help you to identify the problem when you make a more permanent repair.
- The area must be dry to use the roof patch. Once it’s dry, apply a liberal amount of the roof patch to the leaking area. Use a scraper to spread it evenly, and ensure the entire region is covered.
- Once the roof patch has dried, use caulking to cover the edges and any holes that appear. You can use your finger to make sure you get the caulking spread around to the entire area.