Adding a new section to your home? Whether it’s an addition, garage, or covered porch, it might require tying the new roof into the existing roof. This process is more complex than it might seem and must be done carefully to ensure structural integrity, proper drainage, and weather resistance. In this guide, we’ll walk you through how to connect a new roof to an existing roof, including the tools and materials you’ll need and the essential steps for a successful installation.
How to Connect a New Roof to an Existing Roof
Follow these general steps to properly tie in a new roof to your current roof system. Please note that roof construction is a complex task and should only be performed by experienced DIYers or professionals.
1. Design the Roof Extension
Start with a solid design. The pitch and style of the new roof should match the existing roof for a seamless appearance and proper drainage. Your design should include framing plans, dimensions, and materials.
2. Remove Shingles Where Roofs Will Connect
Carefully remove the shingles along the area where the new roof will join the existing structure. Use a utility knife and pry bar to lift the shingles and remove the nails. Take care not to damage surrounding materials.
3. Expose Roof Sheathing
Once the shingles are removed, expose the roof sheathing to create a clean work surface for tying in the new structure. You may need to cut or adjust the existing sheathing to accommodate the new framing.
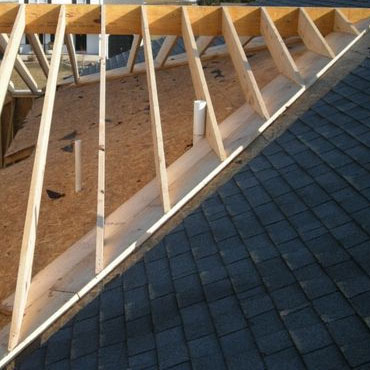
4. Frame the New Roof
Use your lumber to construct the frame for the new roof section. Attach the new rafters or trusses to the existing structure, using metal framing connectors for added strength. Ensure everything is level and square, and that the framing aligns with the pitch of the original roof.
5. Install Roof Sheathing
Cover the new framing with roof sheathing (typically plywood or OSB). Make sure the sheathing is flush with the old roof and securely fastened to the rafters.
6. Install Underlayment
Lay down a layer of roofing underlayment over the sheathing. Overlap the underlayment with the existing roof to create a waterproof seal. This layer acts as a barrier to moisture and helps prevent leaks.
7. Add Flashing
Proper flashing is essential where the new roof meets the existing roofline. Install step flashing or a metal transition flashing to direct water away from the seam. This step is critical to preventing water infiltration at the joint.
8. Install Shingles
Shingle the new roof section, starting from the bottom up. Overlap the new shingles with the old shingles at the joint, and follow the same pattern and color to ensure a uniform look. Be sure the shingles are properly nailed and sealed.
9. Inspect and Seal
Inspect all seams, joints, and transitions. Use roofing sealant as needed to seal around flashing and nail holes. Double-check for any gaps or weak points where water could enter.