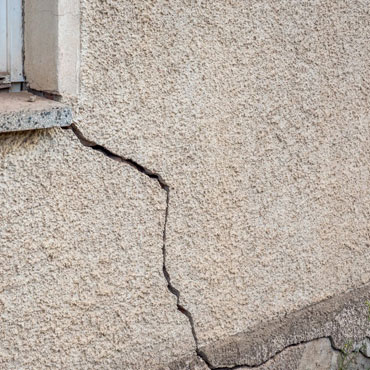
Stucco is a durable and attractive siding option, but like any exterior material, it can develop cracks over time. These cracks may be caused by shifting foundations, weather exposure, or simple age. While small cracks may seem minor, leaving them unrepaired can lead to moisture intrusion, which causes further damage and even mold growth. Fortunately, repairing cracks in stucco siding is a manageable DIY project if you have the right materials and follow the proper steps.
Step-by-Step Instructions To Repair Stucco Cracks
Follow these general steps to properly tie in a new roof to your current roof system. Please note that roof construction is a complex task and should only be performed by experienced DIYers or professionals.
Inspect The Cracks
- Walk around your home and examine all visible stucco cracks.
- Determine whether they are hairline cracks (less than 1/16-inch wide) or larger cracks.
- Note areas where damage may be spreading or where moisture stains are visible.
Prepare The Area
- Use a wire brush to clean dirt, loose debris, and flaking stucco from the crack.
- For larger cracks, gently widen the opening with a cold chisel and hammer to create a “V” shape. This helps the patching material bond more securely.
- Remove dust and debris using a shop vacuum or stiff brush.
Repair Hairline Cracks
- Load exterior-grade caulk into a caulk gun.
- Squeeze caulk directly into the crack, making sure it penetrates fully.
- Smooth it out with your finger or a putty knife.
- Allow it to cure according to the manufacturer’s instructions.
Repair Larger Cracks
- Dampen the crack area with a sponge or spray bottle filled with water. This prevents the stucco from drying too quickly.
- Apply stucco patching compound with a trowel or putty knife, pressing firmly to fill the crack completely.
- Feather the edges so the patch blends with the surrounding surface.
- Allow the compound to dry as directed. Some products may require multiple coats for deep cracks.
Texture And Finish
- Once the patch is dry, use sandpaper or a trowel to match the texture of the surrounding stucco.
- If needed, use a sponge while the patch is still slightly damp to mimic a rougher finish.
- After curing, paint or apply exterior finish to blend the repair with the rest of your siding.
Inspect Your Work
- Check the patched areas once they’ve fully dried.
- Look for any gaps or uneven spots and reapply patching compound if necessary.