A broken garage door spring can bring your entire garage door system to a halt. Because springs counterbalance the weight of the door, they make it possible to open and close smoothly—whether manually or with an automatic opener. When a spring fails, the door may feel extremely heavy, open unevenly, or refuse to move at all. Learning how to replace a garage door spring can help restore functionality, but it’s important to understand that this is a high-risk repair that requires precision and strict safety precautions.
Below is a comprehensive guide outlining the tools, materials, and step-by-step process for replacing a garage door spring.
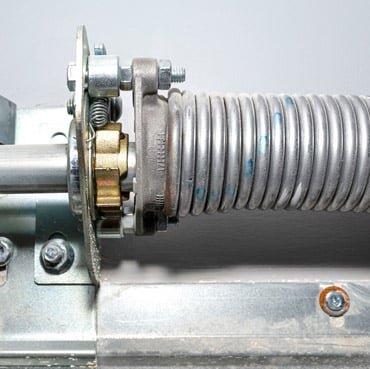
Understanding Garage Door Springs
There are two primary types of garage door springs:
- Torsion springs – Mounted horizontally above the garage door opening.
- Extension springs – Located along the horizontal tracks on either side of the door.
Torsion springs are more common in modern systems and operate under significant tension. Extension springs stretch and contract as the door moves. The replacement process differs slightly between the two, but torsion spring replacement is generally more complex and hazardous.
Safety Considerations: Garage door springs store a tremendous amount of energy. Improper handling can result in severe injuries. Always use proper winding bars, wear protective gear, and never attempt adjustments without understanding the mechanics of your system. If your door feels unbalanced after replacement, do not continue operating it until it’s properly adjusted.
Step-by-Step Instructions For Replacing A Torsion Spring
Important: If you are unsure about any part of this process, stop and contact a professional. Torsion springs are under extreme tension and can cause serious injury if mishandled.
Step 1: Disconnect The Power
Unplug the garage door opener and pull the emergency release cord to disconnect the opener from the door. This ensures the door can move manually and prevents accidental activation.
Step 2: Secure The Door
Close the garage door completely. Clamp locking pliers or C-clamps onto the track just above one of the rollers to keep the door from lifting while you work.
Step 3: Mark The Torsion Shaft
Use a marker to draw a line across the torsion shaft and drums. This helps you verify proper alignment when installing the new spring.
Step 4: Unwind The Broken Spring
Insert a winding bar into one of the winding cone holes. Hold it firmly and loosen the set screws using a wrench. Carefully lower the winding bar to release tension one quarter turn at a time. Insert the second winding bar before removing the first and continue unwinding until all tension is released.
Repeat the process on the other spring if your system has a two-spring setup.
Step 5: Remove The Old Spring
Once the tension is fully released, disconnect the cables from the drums. Loosen the set screws and slide the torsion springs off the shaft. Inspect the center bearing and replace it if necessary.
Step 6: Install The New Spring
Slide the new torsion spring onto the shaft, ensuring it is oriented correctly (left-wound and right-wound springs are different). Reinstall the cable drums and thread the lift cables properly into place.
Tighten the set screws on the stationary cone and ensure everything is aligned with your original markings.
Step 7: Wind The New Spring
Using winding bars, begin winding the spring according to the manufacturer’s recommended number of turns (typically based on door height). Insert the winding bar fully into the cone before applying pressure. After reaching the correct tension, tighten the set screws securely.
Step 8: Remove Clamps and Test The Door
Carefully remove the clamps from the track. Lift the door manually to test its balance. It should lift smoothly and stay in place when partially open. If the door rises too quickly or falls, the tension may need minor adjustment.
Reconnect the garage door opener and test automatic operation.
Replacing Extension Springs
If your system uses extension springs, the process is somewhat simpler but still requires caution. Open the garage door fully to relieve tension, clamp it in place, disconnect the safety cables, and remove the old springs. Install the new springs, reattach safety cables, and test operation.