Moisture intrusion around windows and doors is one of the most common and costly problems homeowners face. Even small gaps can allow water to seep inside, leading to rot, mold growth, insulation damage, and higher energy bills. Over time, unchecked moisture can compromise your home’s structure and reduce indoor comfort.
The good news is that many moisture issues can be prevented with proper inspection, sealing, and maintenance. Understanding where moisture enters and how to address it can help protect your home for years to come.
Signs Of Moisture Problems Around Windows and Doors
Catching moisture intrusion early can save you from major repairs. Common warning signs include peeling paint, bubbling drywall, soft or discolored wood, condensation between glass panes, drafts, musty odors, or visible mold near frames and sills. If you notice any of these issues, it’s important to act quickly.
Tools and Materials You’ll Need
Before starting any moisture prevention work, gather the proper tools and materials. Having everything ready will make the job smoother and more effective.
Step-by-Step: How To Prevent Moisture Intrusion
Step 1: Inspect Windows and Doors Thoroughly
Start by examining all exterior windows and doors from both inside and outside. Look for cracked caulk, gaps around frames, loose trim, or damaged weatherstripping. Pay close attention to corners and the bottom of frames, where water often collects.
Step 2: Remove Old or Damaged Caulk
Using a utility knife or scraper, carefully remove any old, cracked, or peeling caulk. This step is critical as new caulk won’t adhere properly to failing material. Clean the area thoroughly to remove dirt, dust, and residue, then allow it to dry completely.
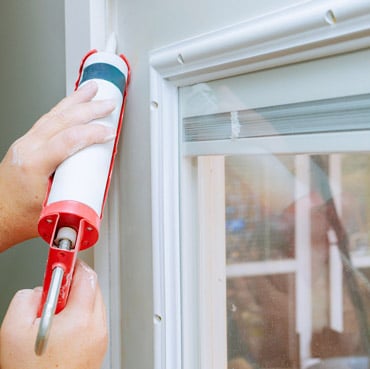
Step 3: Apply New Exterior Caulk
Load your caulking gun with exterior-grade caulk designed to withstand temperature changes and moisture. Apply a smooth, continuous bead along seams where the window or door frame meets siding or trim. Use a putty knife or your finger to smooth the bead and ensure a tight seal.
Step 4: Check and Replace Weatherstripping
Inspect weatherstripping around doors and operable windows. If it’s cracked, flattened, or missing, remove it and install new weatherstripping that fits snugly. Proper weatherstripping helps block both moisture and air leaks, improving energy efficiency.
Step 5: Inspect Flashing and Add Flashing Tape If Needed
Flashing directs water away from window and door openings. If flashing is damaged or missing, moisture can seep behind siding. Carefully remove trim if necessary and apply self-adhesive flashing tape around the frame, especially along the top edge, to redirect water outward.
Step 6: Repair Damaged Wood Or Trim
If you find soft or rotting wood, repair it before sealing everything back up. Use exterior wood filler or epoxy to restore minor damage. For extensive rot, replacement may be necessary. Sand repaired areas smooth before reapplying caulk or paint.
Step 7: Test For Leaks
After completing the work, test your seals by lightly spraying water around windows and doors with a garden hose. Check inside for any signs of moisture. If water appears, identify the source and reseal as needed.
Long-Term Prevention Tips
Routine maintenance is key to preventing moisture intrusion. Inspect caulk and weatherstripping at least once a year, especially after winter or heavy storms. Keep gutters clean so water is directed away from windows and doors, and ensure exterior grading slopes away from your foundation.