Learning how to properly install step flashing along roof-to-wall transitions is essential for preventing roof leaks and protecting your home from water damage. Roof-to-wall intersections are especially vulnerable because water naturally runs down the roof and can seep behind siding or shingles if flashing is missing, damaged, or installed incorrectly.
Step flashing is designed to direct water safely away from these transition points by layering metal flashing pieces with roofing shingles. When installed correctly, it creates a durable, watertight barrier that helps protect the roof decking, underlayment, and interior structure from moisture intrusion.
This guide explains how to properly install step flashing along roof-to-wall transitions, including the tools and materials needed and the step-by-step process for completing the job.
Step-by-Step Instructions
Step 1: Remove Existing Materials
If replacing old flashing, carefully remove the shingles and any damaged flashing around the roof-to-wall transition.
Use a pry bar to gently lift shingles and remove roofing nails without damaging reusable materials. If siding overlaps the flashing area, you may need to temporarily loosen or remove a portion of the siding to gain access.
Inspect the roof decking underneath for signs of water damage, rot, or mold. Address any structural issues before moving forward with new flashing installation.
Step 2: Install Roofing Underlayment
Before placing flashing, make sure roofing underlayment or waterproof membrane is installed beneath the shingle area.
The underlayment provides an extra layer of moisture protection in case wind-driven rain or ice buildup occurs. At roof-to-wall transitions, extending ice and water shield up the wall slightly can provide additional leak protection.
Proper preparation is an important part of how to properly install step flashing along roof-to-wall transitions, as skipping this step can leave vulnerable gaps in moisture defense.
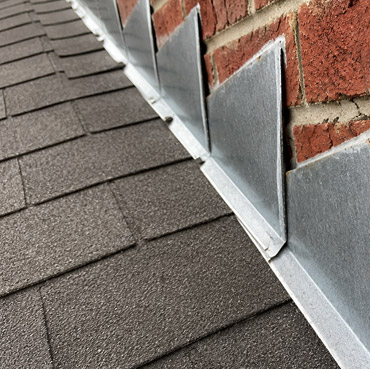
Step 3: Position the First Piece of Step Flashing
Begin installation at the lowest point of the roof where water naturally drains downward.
Place the first L-shaped piece of step flashing so one side rests on the roof deck while the vertical side extends up the wall. The flashing should overlap the first shingle course and sit flush against the wall surface.
Secure the flashing with roofing nails placed near the upper edge so they will be covered by the next shingle layer. Avoid nailing the flashing directly to the wall, as movement between roofing materials can cause problems over time.
Step 4: Alternate Shingles and Flashing
The key to how to properly install step flashing along roof-to-wall transitions is layering each flashing piece with shingles in a stair-step pattern.
Install the next shingle course over the first flashing piece. Then place another section of step flashing over the shingle so it overlaps the piece below.
Continue alternating shingles and flashing pieces up the roof slope. Each flashing section should overlap the previous one to create continuous water protection.
This layered installation ensures rainwater is directed onto the shingles and safely away from the wall instead of underneath roofing materials.
Step 5: Secure and Seal the Transition
Once all flashing sections are installed, inspect the transition area for proper alignment and overlap.
Reinstall any siding or trim that was removed, making sure it covers the vertical leg of the flashing without trapping moisture. Apply roofing sealant sparingly only where recommended, such as around exposed fasteners or termination points.
Avoid excessive caulking, as step flashing should primarily rely on overlapping materials, not sealant alone, for waterproofing.
Step 6: Inspect Your Work
After installation, check for gaps, loose shingles, or improperly aligned flashing sections.
Run water from a hose over the roof area if possible to verify proper drainage. Water should flow smoothly down the roof without entering behind siding or pooling near the flashing.
Taking the time to inspect your work helps ensure how to properly install step flashing along roof-to-wall transitions is done correctly and provides lasting protection against leaks.